Introduction
In this module we are going to learn how to get from A to B and to keep a track of where we are when there is nothing to fix with. Nothing to see but sea! Navigating.
Topics covered in this module are
- Dead Reckoning.
- Estimated Position.
- Course to Steer.
- The Running fix.
- GPS fixing techniques
Including leeway drift and errors.
There are a few terms and standard notation to revise first:
|
||||||||||||||||||||||||
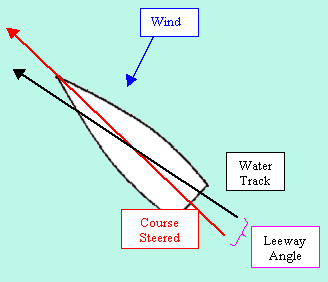 Water track
is the course through the water a vessel makes.
Water track
is the course through the water a vessel makes.
Leeway is the angle between the vessels course steered and its water track.
On some courses, particularly when the wind is on the beam or forward of
it, our water track is governed by two forces:
Our forward speed and the wind
pushing us sideways. This angle is hard to judge and accuracy comes with
practice and experience. Take a bearing of the wake of your boat, then compare
it to the reciprocal of your course steered (reduced to magnetic). The
difference is your boat's leeway. Different types of vessel have varying
amounts of Leeway, just like a high-sided truck might be blown over on the
motorway, but your car will not.
This method is used to work out our position when we cannot see any marks, or we cannot positively identify the marks we can see.
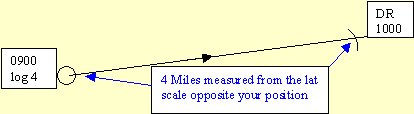
Here is an 8 step guide for plotting a Dead Reckoned position:
- From a known position (Fix), note your log reading and time. (4 M at 0900UT)
- Then steer a course. e.g. 100° Magnetic.
- After some time, perhaps an hour on a passage, take a further note of the log. (8M at 1000UT).
- Take the first log reading from the second and you have the distance run in the hour since you took your fix.(4M)
- Next reduce your course steered to a True course... eg, 100º Compass. No deviation. 5° west variation becomes 095° T.
- Plot this bearing from your fix.
- Open your dividers to measure 4 miles on the latitude scale.
- Place the dividers on the fix and mark off 4 miles along the course. This is your DR position.
Can’t remember variation ?
|
Dead reckoned positions are useful when you need a quick idea of where you are or when there is no tidal stream. After the last module though, you know the tide might be going somewhere other than where you’re going and faster!
So we need a better method……
This method takes account of both tide and leeway.
Here’s a four step guide to working out your Estimated Position.
- Plot a DR, but include leeway.
- Find out the tide experienced in your area between your fix and the time of the EP.
- From your plotted DR position, plot the tide
- The end of the tide is your EP
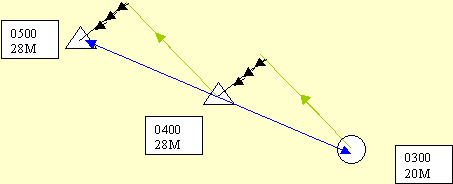
Let’s work through an example.
You need Chart 1.
Step 1.
We are crossing the channel from France and luckily sight EC’A’ Buoy
(50º 01’.0 N 005º 10’.6 W). The time is 0300 BST and the log reads 20 miles. We are heading for Fowey. Our course is 320º Magnetic. (I am keeping this simple at present and not dealing with compass Deviation). Let’s plot that lot.
At the buoy draw a circle and put the time and log reading next to it.
From the buoy, plot (draw a line) the course in True.
Yes, we have to work out the variation first. You can see the nearest compass
rose showing Variation of 7º W.
True to Magnetic add west. Magnetic to True minus west.
Take 7º from the course steered.
i.e. we are steering a course of 313º True.
We also have a northeasterly wind blowing and we estimate our leeway
at 5º. In other words, because the wind is coming from the east, over our
starboard bow, the boat will be blown to the west. So, although we are
steering 313º True, (the pecked line) we are actually being pushed off
our course by a further 5º. This is the leeway we are making. Therefore, the
actual course is 308º True – this is known as the
water track.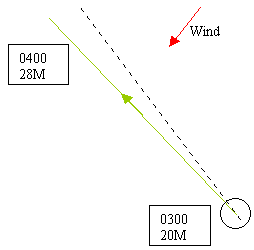
If that is a bit difficult to understand, try to remember: -
"Wind on starboard side reduce for EP";320º – 7º (Variation) – 5º (leeway) = 308ºT
308ºT is the bearing to plot from your fix to take
account of magnetic variation and leeway suffered.
At 0400 our log reads 28 miles. We have covered 8 miles in one hour.
With the dividers measure 8 miles (minutes of lat) opposite your position and mark that off along your water track including leeway, to produce a DR.
So far, we have completed Step 1 of the Estimated Position
Step 2.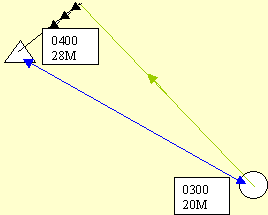
By using either the Tidal Diamond on the chart or the Tidal Stream Atlas, we find that the tide over the LAST hour in our area has been 230ºT at 1.2 Knots.
Step 3.
From your DR position, plot a line at 230º T for 1.2 miles.
Step 4.
At that point draw a triangle and write down the time and log reading. That is your new position and your vessel has travelled between the circle and triangle, not along the two lines!
The line which joins the circle to the triangle is called the Ground
track. If you measure the distance between the two, you will see your
vessel’s speed made good or
Speed over the ground.
In the above example we have done a one hour EP. If you only travel for
half an hour then use half an hour of tide. (half the speed of tide in knots)
Notice that we are not making a good ground track for Fowey. We can either carry on doing one hour EP's, plotting the tide and Ep every hour like this.
Or if you are on a longer trip or just haven't had time to do an hourly EP, you can just add up your distance run, plot it then plot all the different tidal rates and streams on the end. As you can see, the result will be the same.
If you had to alter course for some reason eg tacking to windward, then you simply plot your water tracks including the leeway, then plot the tide on the end.

Occasionally you will need to use this technique (EP) to look forward in time
to find out where you are going to end up. Your log will tell you how far you
have gone, say in the last half an hour. So you assume that speed and can
Estimate where you will end up in half an hours time by plotting your suspected
water track and then the tide on the end. This method is a guide only as your
speed may change over the period.
Exercise19
| CRUCIAL STUFF! |
|
Using Estimated position has lots of error.
- Your log will not always give you a true distance covered. See Module 1, Logs
- Your course steered may well not be accurate, due to helmsman error or various compass errors. See Module 1, Magnetics
- Leeway is hard to judge accurately, even with experience.
Because the boat does not go where we point it we need to be very careful. If there were a danger along the ground track then we would have hit it! Remember EP is finding out where we have been! not where we are going.
When the wind is against us we have no choice about our course. We steer as close to the wind as possible. Usually about 45º off. We have to EP.
Deck log
I keep going on about log readings and times and I feel I should
mention this log. Not to be mixed up with the log (distance measuring
device)
This is the ships log. A legal record of the yachts activities. You must keep
a log. There are two reasons for keeping it
- It's the law
- It is impossible to navigate effectively without one.
In the log, you keep a note of all Times, log readings, courses, and
positions Then you will have them when needed later. (remember that most of
navigation is done retrospectively)
Also in a good ships log will be weather information, barometer readings, VHF
calls (this is also a regulation) A narrative is also helpful, telling the
story of the day. For example, if you had a collision or a man overboard or any
kind of notable incident, these must be logged.
Write in ink and in capitals as it is often tricky to read small case when it
has been written in a storm!
I say write the log. What I mean is make sure it is written. You probably will
not have time to keep it your self, but you have chaps to do that.
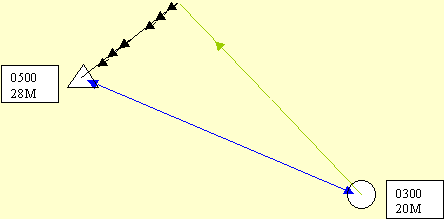
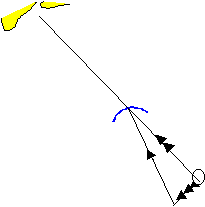
This is where we take control of our destiny and work out a course to make best use of wind and tide, rather than simply pointing the boat and suffering them!
To learn how to shape a Course to steer, we will use the same situation as in EP above.
Here is a 5 step guide.
- Plot your desired Ground Track.
- Find out the tidal rate and direction in your area for the next hour.
- Work out your True Course to Steer, allowing for tide.
- Counteract your leeway.
- Convert to the Magnetic Course to Steer.
Step 1.
We have a fix at the EC’A’ buoy. It is 0300. The log reads 28 miles. Wind is northeast and we have found that the tide will set at 230ºT and its rate will be 1.2 knots over the next hour.
Course to steer is planning into the future.
| Rub out all traces of your EP. Draw in another circle with the time and log reading around the buoy. Now, this is where things change. Draw a line from the buoy to Fowey entrance and put two arrows on it (Ground track). Step 2. Mark off the 1.2 knots of tide on 230ºT FROM THE BUOY. |
 |
|
| Step 3.
Next we have to guess at our boat speed. As we sail along my eyes are usually glued to the speedo to make sure we are going faster than every one else. I’m sure you will be just the same! You will know the speed. Let’s assume 8 knots. Measure 8 Miles (minutes of Lat) on the lat scale. From the end of your pencilled in tide, scribe an arc across the ground track with the dividers set at 8 miles. Put a mark at this point in pencil. Draw a line from the end of the tide to this mark with your plotter. Now, find out what the bearing is from the end of the tide line to the mark. About 330º T? That is the True COURSE TO STEER, allowing for tide. |
 |
|
|
Before you ask – ‘scribing an arc’ in this case simply means;
The most common mistake when working out Course to Steer is normally made at this point. You naturally look at where you want to end up overall (i.e. Fowey entrance), rather than where you can go in the next hour. So you might be tempted to draw a line straight to Fowey entrance from the end of the tide. You then use that as the True course to steer. This is wrong! – Remember to ‘scribe the arc’ instead!! Step 4. Now we have to counteract the leeway. We will be blown west by this
Northeaster, so we must add on 5º to counter it. i.e. steer more to the
East. Step 5. Then we have to convert to Magnetic. "True to Mag add west
.Mag to true minus west". 335º plus 7º variation = 342º Magnetic
is the COURSE TO STEER to stay on the Ground track. The boat will
sail up the ground track but its heading will be somewhere else.
|
||
| If you measure the distance from the fix to the scribed mark, it is also the ground speed. Measure it on the lat scale. Yes, the tide is slowing us down a bit. We are making good 7.8 Knots. How? It’s easy. Just measure your ground track (two arrows) as shown. From this we can work out our speed and therefore our time of arrival at a given point.
|
 |
|
Using the simple formula. "Dinner Time Session" (I was taught this one by a Royal Marine Who was terrible at math’s, but loved going to the pub at dinner time!)
To explain this, let’s see when we will leave the "area to be avoided" around our buoy?
We know from measuring the ground Track, that our speed is 7.8 knots. I make the magenta limit line to be 0.7M from the buoy.
Put the numbers into the formula: -
Therefore, to find the time taken to leave the area, we use the formula as follows;
Time = Distance / Speed
Distance is 0.7 M
Speed is 7.8 knots (nautical miles per hour)
Time = 0.7M / 7.8Knots = 0.089 hours
To convert the time from hours to minutes, just multiply by 60 = 5.38 minutes.
 |
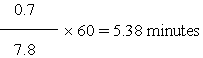 |
5. 38 minutes to get out of the area that we should not have entered in the first place!!
Time equals Distance over Speed. (Multiply by 60 to convert hours to minutes)
Speed equals Distance over Time. (Change minutes to hours first - divide by 60)
Distance equals Time multiplied by Speed. (Change minutes to hours first - divide by 60)
If all else fails, there is a Time, Speed and Distance table in all almanacs, but I’m afraid you don’t have one in the Practice Navigation Tables.Even if you are only using your course to steer for a few minutes, you still draw the tidal vector for an hour. All those lines and arrows are a vector diagram. If your chart covers such a small area that you cannot plot the boat speed and tide for an hour then Mini vectors
If crossing the channel or your destination is more than one hour away, you could decide to compile a multiple tidal vector to stay on the fastest ground track over the whole passage. There are a few problems with this method. First you must be sure that the courses steered do not take your vessel over or too near to dangers. Second, for this method to work, your speed needs to be relatively constant throughout. (difficult on a sailing vessel!)
Here's how.
Using the tidal stream atlas (with the correct High water time pencilled in!)
Guess at a speed that your vessel is likely to make. Then mark off dead reckoned
positions
in the tidal atlas for each hour. Make a note of rate and direction at the DR for
each hour. Do
this until you have reached your destination, then count up the hours.
Next plot the required ground track, from the start point to the destination. From the
start point, plot all the tides as shown. From the end of all these tides, using
your boat speed multiplied by the number of hours that you found it would take,
scribe off an arc through the ground track to gain the course to steer.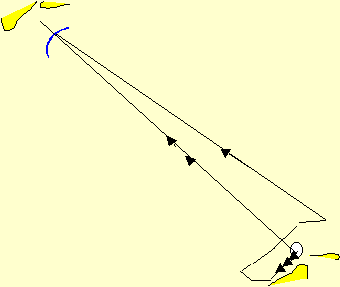
| CRUCIAL STUFF! |
|
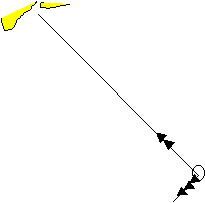
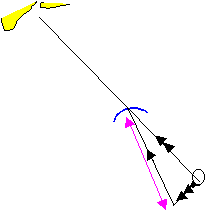
The
Running Fix
This is a method of fixing when there is only one point to fix on.
For example, you
are on passage across the channel for Plymouth and you sight the Eddystone
lighthouse. This is all you can see as the visibility is down to three miles.
Take a bearing of the lighthouse and note the time and log reading and course
steered. Wait until the bearing has changed by at least 40 degrees, then
retake the bearing and note time and log again.
Plot fix like this.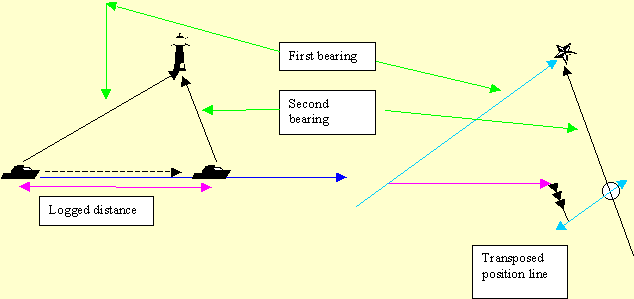
On the chart, plot the first bearing to the
lighthouse. Then from anywhere on that line draw out your course
steered. Mark off the distance run along this line. (logged distance
between the two bearings) On the end of your distance run, plot the tide for the
time between the two bearings. Plot the second bearing.
Now "transpose" (keep it parallel) the first bearing through the end
of the tide. this transposed bearing will also cut the second bearing and that
is your fix.
Ok now a few words about cheating!
We all have GPS these days and here are a few methods to make good use of the machine
Waypoint webs
This is a method of quickly finding out where you are when you don't have
time to plot a Lat Lon from the GPS. (which you might well interpret incorrectly
anyway!)
Lets assume that we are tacking into Torbay in a westerly wind, in the dark.
there are only two of you aboard so not much time for navigating!
Before you started you have prepared yourself a way point web to help
free off the navigator as you get close. All he has to do is check the distance
to go and the bearing to the waypoint at Paignton to be able to put his
finger on the yachts position.
the GPS shows the bearing to waypoint as 277mag and the distance as 1.5M.
because you have the web its easy to put your position on the chart. Don't
forget to tell the GPS to give you a True or Mag display!

the trickiest bit with this stuff is simply working out how to enter a waypoint
into the various GPS sets, but you soon get used to your own.
Cross track error ladders.
We are now on our way to Holcombe Bay. its still dark and we are two up, but
at least the winds behind us for a change! Unfortunately the leading lights are
obscured by bad vis. A cross track error ladder can show us quickly and easily
where we are. Again with out plotting Lat lon.
just enter Holcombes front leading light as a waypoint then draw the ladder as
shown. Just like the waypoint web, you can easily plot your position from the
XTE readout (how far off the ground track you are to left or right) and the
distance to the waypoint.
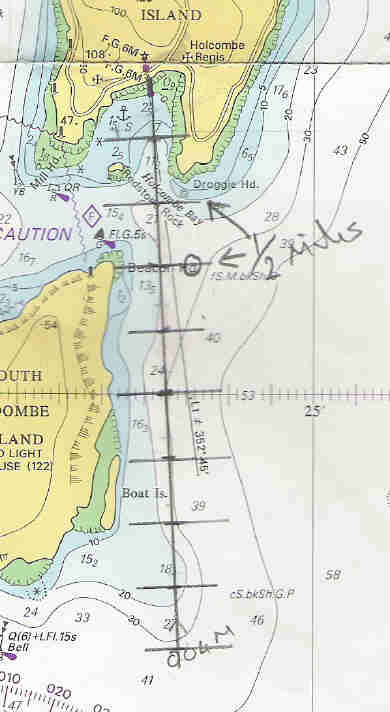
You cannot see the scale on this picture, but I hope you get the idea. the GPS says XTE 0.3M and the distance to go (to the waypoint) is 1.5M so that's where we are!
That’s all for this one.
I hope you know the meaning of a line with one, two, or three arrows on it.
You know that in navigation, the yacht’s position is not known exactly, there are lots of errors, but by keeping a good record and careful work you can reduce those errors sufficiently to make your EP usable.
If by some miracle the wind allows you to go where you want to, you can lay off a course to make the best use of the tide and you will know how long it will take to get there.
You are never going to forget that boats don’t go where you point them, they are always going somewhere else, and that somewhere else is governed somewhat by your course steered, but also by leeway and tidal stream.