Introduction
The objective of this Module is to re familiarize you with Charts, including
- Symbols,
- Latitude and Longitude,
- Scale and Projection,
- Magnetics,
- Deviation,
- Distance measuring and the Knot,
- Position,
- Fixing by magnetic compass and other means.
These skills are the basis of navigation at sea and we will build on them in Module 3 Navigation.
Paper charts do a difficult job very well indeed. They have to represent the curved surface of the sea and land on a flat chart table! and be accurate enough for us to pick our way into a harbour in the dark.
They show
- Depth,
- The nature of the sea bed,
- Land,
- Beach,
- Dangers,
- Features on land,
- Navigational marks at sea.
In addition they also have information about tides, currents, shipping lanes and notes about anything relevant to navigating in that area.
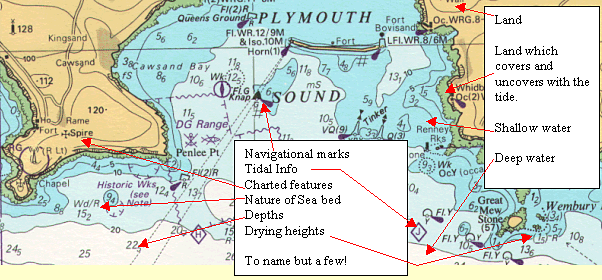
Read this section in conjunction with Symbols booklet (Chart 5011) and the chart. On the back cover of 5011 you will see a quick reference guide. Very useful! It does take a while to gain familiarity with the numerous symbols, so keep the 5011 very near to hand!
The first thing to do, every time you look at a new chart is check the scale. Bear in mind that over a days passage you may use ten of them, all with different scales! Look at the scale! On your practice charts, you have two different scales.
Chart 1 is 1: 150,000 and chart 2 is 1:75,000.(You can see this in the notes below the chart’s name). These numbers are all very useful to the chart maker, but to get a mental picture of our chart , we must know how big an area it covers in Nautical miles. These are nothing to do with statute miles, yards, feet, inches etc. Those measurements have been arrived at by rather haphazard methods, e.g. the "length of a man’s arm or his foot!"
A nautical mile is completely different. It is derived from 1 minute of Latitude. Read on.
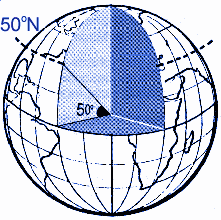
Imagine cutting the Earth into 90 degrees, the angle being measured from the centre of the Earth. The Equator is at zero degrees (a belt around its middle) and the North Pole at 90 degrees. Each degree, where it touches the surface, creates a Parallel of Latitude, just like the Equator but further up or down.
The perpendicular distance between these parallels (where they cut the surface) is 60 Nautical Miles (Sea Miles). Degrees are broken down into 60 smaller units called minutes. Each MINUTE when measured is 2000 yards which becomes ONE NAUTICAL MILE (Crucial). Each minute is also broken down into tenths or decimals of a minute.
 These
are called CABLES
These
are called CABLES
1 Minute of Latitude is equal to 1 Nautical Mile
10 cables equals one Nautical Mile.
Ok, so one Nautical mile is equal to one minute of Latitude. I cannot say this too often; it’s crucial! Now look at your chart’s Latitude scale (in the side margins) to give you an idea of the scale.
Exercise 1Next we need to think about orientating ourselves on the chart.
You already know that if you were on a parallel of Latitude, that you are standing on a belt going around the world. Well, we also have a set of Braces going up and down! This is more properly known as Longitude.
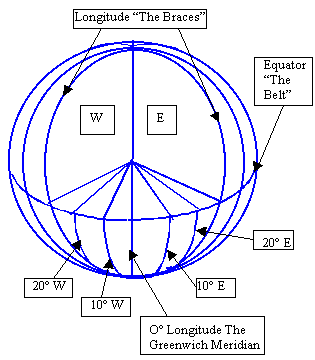 Starting
at the North Pole, running due south through Greenwich in London and ending up
at the South Pole, we have zero degrees Longitude. Fanning out from this
"Greenwich Meridian", we have lots more, cutting the Earth up just
like the segments of an orange. In fact, there are 180 Meridians to the East of
Greenwich and 180 to the west, making 360 degrees of Longitude in all: a full
circle.
Starting
at the North Pole, running due south through Greenwich in London and ending up
at the South Pole, we have zero degrees Longitude. Fanning out from this
"Greenwich Meridian", we have lots more, cutting the Earth up just
like the segments of an orange. In fact, there are 180 Meridians to the East of
Greenwich and 180 to the west, making 360 degrees of Longitude in all: a full
circle.
Each degree of Longitude is made up of 60 minutes, as with Latitude, but
these are not Nautical miles. Each minute is broken into tenths, but
these are not cables.
Why? See Making Charts.
Standing on a parallel of Latitude and a Meridian of Longitude gives you a means of expressing your position on the Earth's surface
 e.g.,
Your position at 1000 UT (GMT) was 50 degrees 01 point 4 minutes north of the
equator and 5 degrees 2 point 8 minutes west of the Greenwich meridian.
e.g.,
Your position at 1000 UT (GMT) was 50 degrees 01 point 4 minutes north of the
equator and 5 degrees 2 point 8 minutes west of the Greenwich meridian.
| Expressed: | |
| 50° 01¢ .4
N 005° 02¢ .8 W |
|
| Latitude is always expressed first!! | |
| CRUCIAL STUFF! |
|
Expressing your position or the position of a charted object can be done in two ways:
- By stating its Latitude and Longitude. (Lat Lon)
- By stating its range and bearing from a charted object
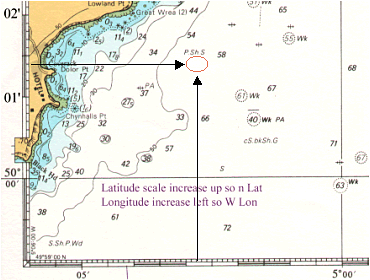
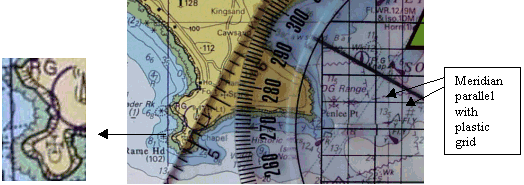
On the Latitude scale, find the exact Latitude. The degrees of Latitude may only be shown once on the scale so be careful. Finding a decimal of a minute can also be difficult on some charts because they are so small. They are also sometimes shown in one or two cable intervals. (Count how many there are in a mile so you understand the scale)
Example. To find 50° 17¢ .4N, 005° 03¢ .6W
|
|
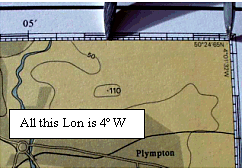 |
| When you have found the Latitude on the side margin, place a plotter on the correct Latitude and draw a pencil line out onto the chart EXACTLY parallel to the Latitude lines. | Next take the dividers and measure the
Longitude on the Longitude scale. In this case we used the edge of the
chart, but you can use any convenient Longitude meridian running up and
down the chart. |
|
|||||
| Now simply take the correctly sized dividers down to your Latitude line (pencilled in) and mark off the Longitude along the line from the correct meridian. | 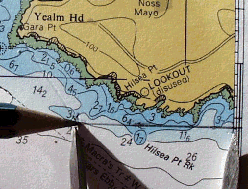 |
 The
first method has a few disadvantages, but is used widely. When using Latitude
and Longitude, it is all too easy to get the numbers muddled and therefore make
a terrible error.
The
first method has a few disadvantages, but is used widely. When using Latitude
and Longitude, it is all too easy to get the numbers muddled and therefore make
a terrible error.
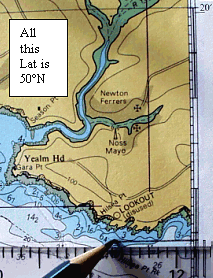
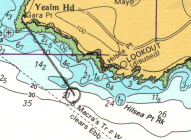
Numbers like these mean nothing to anyone until they are plotted, but a "range and bearing from a charted object" immediately gives the navigator or rescue service an idea of where you are, eg, "Yealm Head 145 degrees 1 mile".
If we know where Yealm Head is (it is a good idea to use prominent coastal features which are widely known), then we can get an idea of the position straight away.
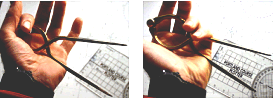
If you can't remember how to use a "Breton Plotter"
Exercise 2Nautical charts are published by a number of different agencies, but mainly
by National bodies of Maritime nations. In the UK, this is the Hydrographer of
the Navy. He produces charts for not only our home waters, but for just about
the whole world: a mammoth task done very fastidiously indeed!
This information is often from very old surveys, done by the likes of capt Cook!
it may also be from hydrographic departments in other countries. have a look at
the Source data diagram on chart 1
There are other commercial chart makers. Some you may come across are: - "Imray" and "Stamford" charts. These charts are based on the Admiralty charts mentioned above and also give other "Yachting information" on the reverse of the charts. These do not always have the same level of detail as Admiralty charts.
For the purpose of this course, we will be using British Admiralty Charts. All charts are only as good as the last time they were corrected and brought up to date. Obviously it would be very dangerous indeed to be using a chart that was out of date. Imagine sailing along in supposed safety, then running straight into a new wreck that is not on your chart yet!
The Admiralty produces chart corrections in the form of weekly "Notices to mariners", which cover all the charts and publications they produce. They also produce a three monthly Small Craft Edition of the notices for home waters, but these are now only available on the Hydrographers web site. www.ukho.gov.uk Each correction has its own number. Look at the bottom left hand corner of the chart, in the lower margin. You will see "small corrections", the years in which the corrections (various numbers) were placed on the chart. When you make a correction, make a note of it here. Chart corrections are normally done in Magenta pen to make sure they stand out. Like me, you probably haven’t got one!
Charts and Admiralty Notices to Mariners are available from Admiralty chart agents. Stamford and Imray charts are also available from bookshops and Yacht chandlers.
Exercise 3ELECTRONIC CHARTS are also available on computer screen via Compact or floppy disc.
These systems are quite recent, and are subject of course to electrical failure on a small yacht. Corrections for these are simple; you simply order the update disk. Unlike the weekly notices to mariners though, you have to pay for this service.
Raster and Vector charts There are two main
types of electronic charts.
Vector charts are more expensive and you can add layer to these. eg if you have
tidal software you can overlay the tides on your vector chart. They also have a
greater zooming in facility. As you zoom in will get a more detailed picture.
however you can zoom past the scale at which the chart was originally made and
this will give you a false sense of security, as the vector chart is only as
good as the paper one it was produced from.
Raster charts are scanned Admiralty charts with the same familiar look as your
paper ones. Because they are scanned, as you zoom in you will eventually start
to see the little square "pixels" of the screen. How much you can zoom
in on an area rather depends on how big your screen is. laptop computers these
days have larger screens and are quite sufficient, but watch out! big screens eat
electricity. you cannot zoom in further than the original chart scale, unlike
the vectors above.
This type of chart is becoming cheaper as technology marches on. At time of writing you could buy 10 electronic (Raster) charts for £80 and the equivalent paper ones would cost you £16 each! Obviously it is cheaper to produce CD's than to print paper! You do however need a computer on board and the software programme. People say " What happens when the PC goes pop"? Well there is no reason that you cannot print off some paper charts from your CD before hand as a back up. They will be rather small if printed on a normal A4 printer but if you can get your hands on an A3 printer they are a good backup. The ink fades though and it is not waterproof, so watch out.
With electronic charts, you have the added advantage of having your GPS position shown on your screen. Very useful in deed! BUT be careful here, some systems will switch to Dead reckoned positioning if they loose the GPS signal and they don't always have a warning beep!
The system we have aboard does not allow the plotting of vectors which is another downfall.
Having a computer aboard has other uses as well. There are tidal prediction software packages. They can tell you the tabulated height of tide for any where any time! and if you have a modem, you can get great weather information from the internet.
I have already mentioned that charts do a difficult job very well, in that they display a curved, in fact spherical object onto a flat piece of paper. To understand how to measure distance accurately, you need to understand a little about how this is achieved.
Mercator Projection is the name given to the method of drawing charts for coastal work in most instances. Look at a chart. Can you can see that all the meridians of Longitude go straight from the top to the bottom?
"Hang on" you’re thinking, I just said they were like the segments of an orange! They are like the orange in reality, but they cannot be drawn that way. Instead the Longitude is pried apart at the top and bottom, so the meridians are parallel. This makes the land within those lines much fatter! To give the land the correct shape, the chart maker stretches the Latitude accordingly. All this is not your concern except that the size of one minute of Latitude (One Nautical mile) appears to increase as you go north.
So, always measure mileage at the Latitude you are situated at (opposite your position).
This method of chart making becomes unrealistic at very high Latitudes and for covering very large distances. As a Coastal skipper you will be doing neither of these, but the method used for these purposes is called "Gnomonic projection"
To recognise these charts, Parallels of Latitude appear as curves and Meridians as straight lines converging towards the poles. Very large-scale charts (harbour plans) also use this projection, but on these the meridians and parallels look straight because the chart covers such a small area.
As you gain more experience you may start to make longer trips, but be
careful as you cannot plot courses on Gnomonic charts in the same way that you
would on a mercator chart.
In coastal situations, we draw a straight line course from A to B, then we
follow it (Rhumb line courses)
 If
we do that over large distances (crossing longitude), we will travel much
farther than necessary. The reason is that we are travelling over a sphere, not
a flat surface. Mercator charts take no account of this, but as the distances
are small, it is of little importance.
If
we do that over large distances (crossing longitude), we will travel much
farther than necessary. The reason is that we are travelling over a sphere, not
a flat surface. Mercator charts take no account of this, but as the distances
are small, it is of little importance.
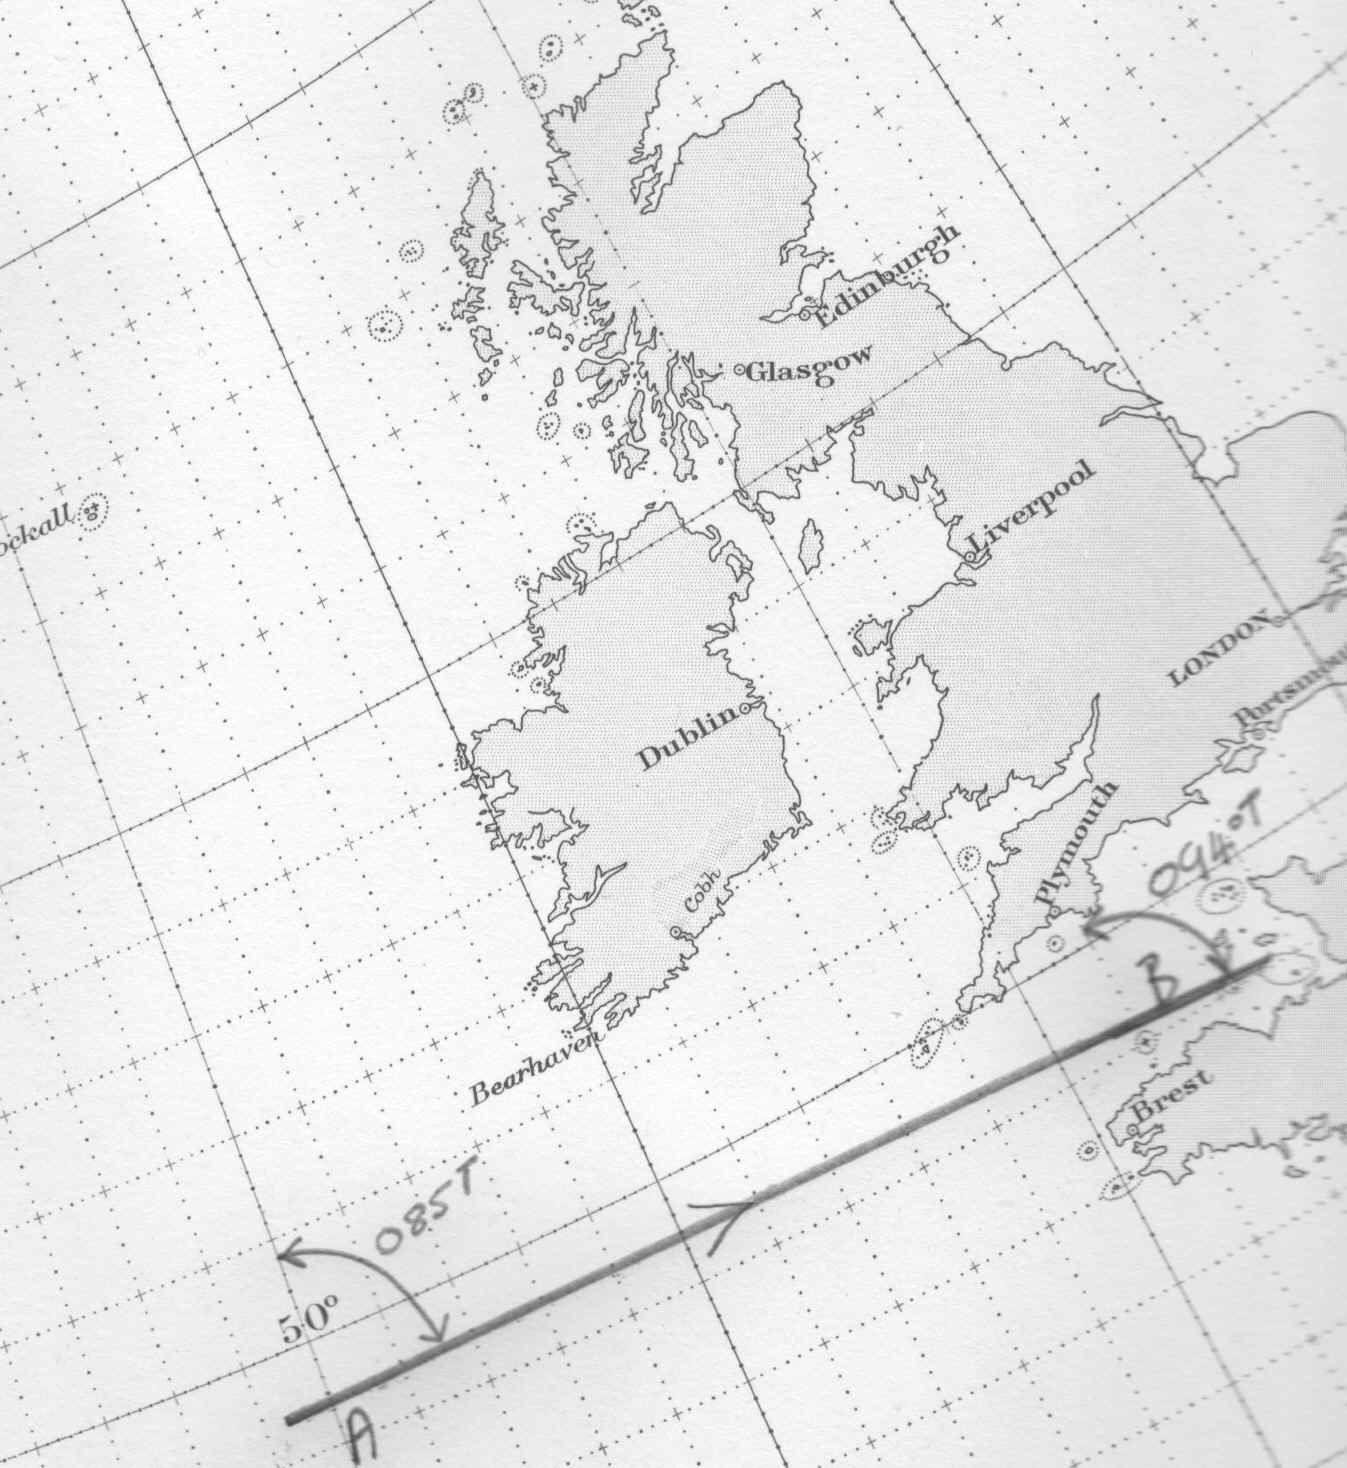
If you draw a straight line between A and B on a Gnomonic chart, the line will
show us the "Great circle route" (the shortest distance between two
points on a sphere)
As you can see, the distance between north and our course at "A" is
085°T where at "B" it is 094°T. Half way between the two points it
would be 090° T.
Yes we have to alter course periodically to stay on the great circle route.
Right! stop worrying about Gonomononic charts or how ever they're called, and
get back to the course!
| CRUCIAL STUFF! |
|
Magnetics
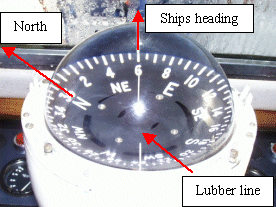 Compasses have a
magnet within them, usually floating in an oil bath. This always tries to align
with Magnetic North. The magnet is fixed within a circular card, which
has around it a 360-degree scale. For clarity this compass does not show the
zeros, so you see 1, 2, 3, 4, 5, 6, etc instead of 10, 20, 30, 40, 50, 60º
etc. Most ships’ compasses have a "lubber line" which you use to
align the ship’s head exactly with the course you are trying to steer. The
cardinal points of the compass are North, South, East and West. You can see on
the example that there are lots of other graduations.
Compasses have a
magnet within them, usually floating in an oil bath. This always tries to align
with Magnetic North. The magnet is fixed within a circular card, which
has around it a 360-degree scale. For clarity this compass does not show the
zeros, so you see 1, 2, 3, 4, 5, 6, etc instead of 10, 20, 30, 40, 50, 60º
etc. Most ships’ compasses have a "lubber line" which you use to
align the ship’s head exactly with the course you are trying to steer. The
cardinal points of the compass are North, South, East and West. You can see on
the example that there are lots of other graduations.
This means that in whatever direction your ship is pointing, you will know how many degrees from Magnetic North you are steering.
Most yachtsman do well to steer within 5 degrees of their required course because the sea throws the boat around, making it difficult to stay exactly on course.
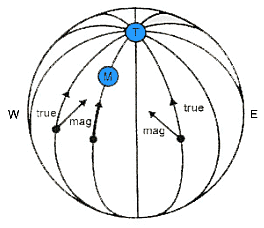
Sorry, but it is not quite that simple. Compasses, as I have said, relate to Magnetic North. The trouble is that your chart is drawn related to True North, the North Pole. (T)
Magnetic North (M) is somewhere in Canada, nowhere near True North! From wherever you are in the Northern Hemisphere, your magnetic compass will point there.
This is not a problem if you know the difference in angle between the two. Depending on our position on the Earth your boat’s compass may be deflected either East or West of the direction of True North. This is known as Magnetic variation.
This variation changes year by year due to the movement of the magnetic pole.
There are also local magnetic anomalies to watch
out for. These are areas of ferrous deposits. Warning notes are given for them
on charts.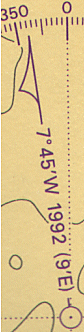
The picture opposite is a clip from a charted compass rose. (See your chart)
7° 45¢ W 1992 (9¢ E)
means that in 1992 the variation was 7° 45¢ West and it was decreasing by 9¢ annually. In 1992 you would have used 8° Variation, this being the closest degree. (Measuring minutes is impossible on a yacht's compass or plotting instrument).So in 2000 the variation in that area would be 7° 45 W minus 8 years at 9¢ per year. 9 5 8 = 72¢ .
72¢ is 1° and 12’ so we would just take away one degree. The variation to use in this example in the year 2000 (to the nearest degree) would be 7° .
Before steering a true course taken from the chart. Look on the nearest compass rose to your position and you can calculate the Magnetic variation.
If there is West variation:
|
Because of the confusion that two "North's" can produce. Always write "T" or "M" after your bearings to avoid it.
It gets trickier!
 Magnetic
compasses are also subject to magnetic influences other than that of the Earth's
magnetic field.
Magnetic
compasses are also subject to magnetic influences other than that of the Earth's
magnetic field.
All Ferrous metal (that which a magnet can stick to) has a small magnetic influence, so engines, pots and pans, gas bottles, fire extinguishers and a whole host of other items can affect your compasses.
Your compass, with no deviation, will align with Magnetic North (not True
North), but if you have any ferrous metals in its vicinity, this will also
deflect the compass.
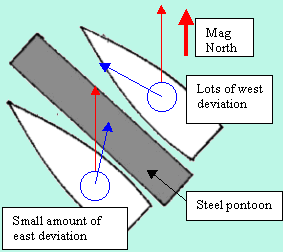
Deviation is caused by ferrous metal aboard, but I have shown the
steel pontoon for ease of explanation.
As you can see from the diagram, compass deflection caused by deviation can be to the east or west, depending on where metallic objects are situated relative to Magnetic North.
Deviation on all ship headings must be checked and noted so that a
compensating correction to the course can be made. If the deviation is very
large, the compass must be adjusted. This is usually undertaken by a compass
adjuster; a professional. He adds or takes out corrector magnets situated around
the compass body to compensate for fixed ferrous objects such as engines.
Obviously neither he nor your deviation check can do anything about the
disastrous consequences of such things as hanging your "Sony Walkman"
(magnets in the speakers) over the compass while on passage! Or deciding to
store the baked beans in a different locker on this trip.
Deviation changes depending on stowage, healing and whether your engines
alternators are working or not (they produce a magnetic field when charging)
So check your deviation regularly. Every time you run down a charted transit, check
it. If you are setting off on a cross channel passage or the like, do a quick
"distant object" check on roughly the course that you will be
taking
There are various methods of checking your compass deviation. This is a very easy method.
On a calm day in a large harbour and preferably with slack tidal stream. Find as many charted transits as you can, on various different headings.
Steer on each one in turn. Have the helm concentrate accurately on the transit and another crew watch the compass. From the chart, you can see the True bearings of the transits. Apply the local Magnetic variation correction. You now know the course your compass should be reading, if you have a different compass course then you have deviation on that heading.
Eg. True bearing of transit is 090° T. variation is 5° W. the compass should read 095° . If the compass reads 100° then you have deviation of 5° W.
If the number is bigger than it should be, then you have West
deviation.
If smaller, then the deviation is east.
| Error West Compass Best. Error East Compass least. |
 If you can find
transits around the harbour for about every 15 or 20 degrees of the compass,
this will allow you to produce a graph to show a deviation curve.
If you can find
transits around the harbour for about every 15 or 20 degrees of the compass,
this will allow you to produce a graph to show a deviation curve.
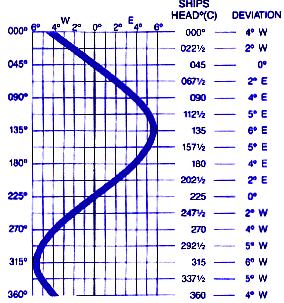
In this case a transit has been found for each 22.5 degrees Not very easy! And it doesn’t need to be so accurate, as long as you have enough headings to be able to get a reasonably accurate graph.
Normally a Deviation curve ends up looking something like this one. i.e. two headings with lots of deviation and two with none.
This procedure is known as swinging the compass.
Having made a curve like this one. you can then easily calculate the
deviation of any particular Magnetic bearing that you want to steer. eg, from
your chart you decide that you need to steer 010°T. Apply
the magnetic variation (eg 5° west) So add 5 = 15°
mag.
Now look in the table to find the deviation on 015. It is between 4°W
and 2°W. Use 2°W
Error west compass best so compass is bigger than mag. Add on 2 to give 17°C
There is an easier way of checking the deviation on any particular heading. I use this a lot when running boats for which I have not been able find the deviation curve and have no time to swing the compass.
With a hand-bearing compass, stand in a "magnetically clean" area away from any magnetic influences, (not at the wheel), and check the course steered. Hand bearing compasses suffer in the same way as ships compasses, but they are portable! You can even sit in the dinghy being towed astern if you want, though I’ve never got quite that keen!
Distant object check
Another quick and simple method. From a known point. (A lateral buoy, a
beacon etc) Find a charted object about 2 miles away or more (tower, chimney
etc). On your chart find the true bearing from the buoy to the tower. Add to
this the local Mag variation then steer towards the tower. Slack tide helps a
lot here! Your compass should give you the correct bearing. If it gives a bigger
bearing, you have west deviation. Smaller, east deviation on that heading.
You can also use this method to find a suitable clean area aboard for taking
magnetic bearings with your handbearing compass. These suffer deviation in the
same way as steering compasses.
Just steer slowly around in a circle while monitoring the bearing of a distant
mark. The bearing should stay constant. If it does not then the position you are
standing to take the bearing is not "magnetically clean"
Some boats, for instance steel yachts, have bigger deviation problems. They
are overcome by various means. Steel yachts can have compass repeaters at
the helm and the main ship’s compass is up the mast! This is method is far
from ideal as the heeling of the vessel requires special damping of the compass.
Fluxgate and Giro compasses
Electronic compasses (Fluxgate compasses). Measure the
Earth's magnetic field electrically, are mounted somewhere away from deviation sources
and preferably in a position where movement is kept to a minimum. (Low down and
midships) A repeater
gives you the heading at the helm. Autopilots and Radars use Fluxgate compasses as do
some hand bearing compasses. These compasses do suffer from deviation but are
usually fitted with auto correcting devices. When fitting and initialising
such instruments it is critical to ensure that they are fixed in a magnetic
clean area. Variation must be entered manually. These compasses can give true or
magnetic courses so watch out!!
Giro compasses are not normally fitted aboard cruising yachts, but are starting
to filter in as they can be attached to GPS sets in order to give constant
accurate heading information
| CRUCIAL STUFF! |
|
(Finding out where you are)
So far we have revised direction and how to express our position on the chart in Latitude and Longitude.
At sea, position is a relative term. If you are sailing among rocks or trying to find a dive site then you need to know your position very accurately. However, when crossing an ocean (where there is nothing to hit) your position may have a ten mile error without causing undue concern.
There are lots of ways of gaining your position.
 This
is probably the most widely used method when close to land and I am sure you
have used it. It involves taking
bearings of known, charted objects with a hand-bearing compass. If you haven't
used one:-
This
is probably the most widely used method when close to land and I am sure you
have used it. It involves taking
bearings of known, charted objects with a hand-bearing compass. If you haven't
used one:-
When you hold a
hand-bearing compass up to your eye, you will see a number in the viewfinder.
This represents the angle in degrees between two lines, one plotted from your
position to Magnetic North and the other from your position to the object.
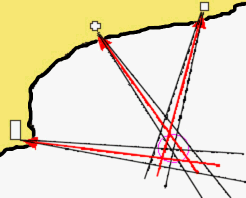
Take bearings of three different objects and you plot them like this.
There must be at least 45 degrees between each object or the fix will be inaccurate. Also if two of the bearings are near to being reciprocal (East is reciprocal of west) then this will also render the fix suspect. There are other errors, which creep in - the bumpier the day, the less accurate the bearings.
On a rough day or when you are unused to handling a compass, the black lines show the likely accuracy of your bearings. Having plotted the fix we end up with a triangle (shown here in red) it is called a cocked hat and our vessel is somewhere close to it. NOT necessarily in it!
Some tips for using this method and hand-bearing
compass
1. Write down the time, the course you are steering and the log reading when you take the fix. Logs measure distance, more about them later, bear with me.
2. Stand in a braced position. The Hand-bearing compass numbers will swing wildly otherwise.
3. Stand away from Ferrous metals. (Hearing aids, radios, steel rimmed glasses etc).
4. Hold the compass level. This allows the card inside to spin freely.
5. Take the bearing which is changing fastest last (The bearing on the beam).
6. Keep the compass up to your eye throughout all three bearings. This saves times and therefore makes the fix more accurate. The card needs time to settle again each time you take it from your eye. The longer it takes for you to take the fix, the more inaccuracy there will be.
7. Take three MAGNETIC bearings of charted objects known to you. You must be sure that what you are looking at relates to the correct feature on the chart.
Next you must convert them to TRUE bearings before plotting them on your chart.
To be able to plot the fix, we need to be able to use a couple of tools. A sharp pencil and a "Bretton Plotter".
Here is a quick revision of how to use a Bretton Plotter.
From the previous page your bearings are reduced to True. We are going to plot
Rame Head church bearing 028º T. (Just West of Plymouth Sound)
 |
 |
| First set the dial to 028º |
Next, place the plotter on the chart pointing the “direction of bearing arrow” towards Rame Head church from seaward and making sure that the North arrow on the dial points roughly north. |
Next, keeping the edge of the plotter on the Church. Rotate the whole thing (Not the dial) to bring the grid on the dial, parallel with the parallels of Latitude or Meridians of Longitude.
The plotter edge should stay exactly in the middle of the church symbol.
| Now check that the church is still on the edge of the plotter and draw a line out to sea from the church. Be careful here, the line you draw must be 028º towards the church. Not from it! Making this mistake makes you 180º out! | 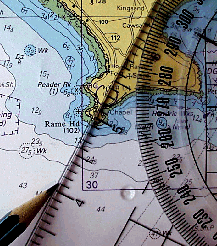 |
Converting Bearings (Mag to True and back)
To convert your Mag bearings to True. Just use this simple formula
| True to Mag add west (variation) | So Mag to true minus West |
| True to Mag minus East | So Mag to true add East |
In the UK we have only west variation so you only need the top bit!
Write this on the margin of your chart or even better, stick it onto your Bretton plotter so you always have it to hand.
| CRUCIAL STUFF! |
|
|

 You
will need to do this operation for the bearing of each charted object.
You
will need to do this operation for the bearing of each charted object.
Plotting bearings is a very simple operation and you will soon get used to it! In navigation, you will use it as often as gear changing in your car!
Having plotted the three bearings from the charted objects you will find that they almost intersect. They virtually never cross exactly due to various errors. Eg, the chart not being drawn exactly, but much more likely causes of error are mis-identification of marks, and user error with the hand compass.
Due to these errors we end up with a "cocked hat" or small triangle rather than a fixed point on our chart. Your vessel will be somewhere in the vicinity of that cocked hat and not necessarily in the middle of it. Draw a circle around your cocked hat. This is the common symbol denoting a fix. Find the nearest danger to that position and assume that you are on the circle rim at the closest point to that danger. That way you can set a course, which will avoid it. Write down the time of the fix next to the circle and also note the log reading.
Logs
| Your "log" is a device, which measures
how far you have travelled. Rather like the distance-measuring device in
your car.
There are various types of log. Some are towed behind the boat and are a simple clockwork device, where a spinner on the end of a long string is towed astern. The spinner twists the string, which is attached to the log. As the string spins, the log counts the miles. Other types include through hull impeller logs and Doppler logs. Impellers work in a similar way to the towed log, but there is no string. Instead a signal is passed from spinner to the readout electronically. Doppler logs have two sensors under the hull. A signal is passed from one to the other. The machine knows how long that signal should take. If the boat is moving, the signal gets across a little faster and the machine calculates the boat speed from this difference. Logs measure distance travelled through the water. If you are sailing in a rough sea, the log will over read because the boat is going up and over waves. The distance the vessel travels through the water is therefore more than it is travelling over the ground.
|
|
||
|

Most logs are set up to read correctly in a moderate sea, will over- read in a rough one and under- read in a smooth sea. So in a rough sea when you check your log and work up a position. You will have sailed further through the water than over the ground. This is safe because you will assume that you have sailed closer to the land or dangers than you actually have. If your log under read in this situation, this would be unsafe. You think you have further to go, but may have already arrived!
Exercise 7
Transit and Bearing fix
 The
three-point fix is not a very accurate method, as it has within it three
magnetic bearings and their associated errors.
The
three-point fix is not a very accurate method, as it has within it three
magnetic bearings and their associated errors.
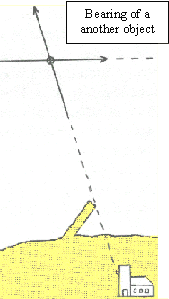
A transit and a bearing is much better. If possible, these should be at 90º from each other.
Two charted objects in line form a transit. These two objects only line up on a certain bearing and that bearing can be extended onto the chart from the closest object to form a position line.
This position line is very accurate provided that the objects are charted correctly and that we have identified them accurately.
Take a magnetic bearing of "another object". Remember this needs to be at least 45 degrees from the transit to give a good angle of cut. After correcting for variation you have a second position line and an accurate fix.
Often this kind of fix can be pre-plotted. If, for example, you are sailing towards a distant headland, you can see that eventually, two charted objects will come into line, in this case the church and the quay. You can plot them before you arrive at the transit.
This is very useful if you are short handed as you can plot at least one of the position lines before you sail or at your leisure.
Dipping Light Fix.
Another very easy method of fixing is using bearing and calculated distance
from a Light. You can only do this when you first see the "flash of
the bulb" rather than just the loom of the light. The loom is useful
because you can use it to positively identify the light before seeing the bulb
flash for your fix.
All you do is watch the identified loom until it flashes (dips above the
horizon). Note the time, log, course and the bearing to the light.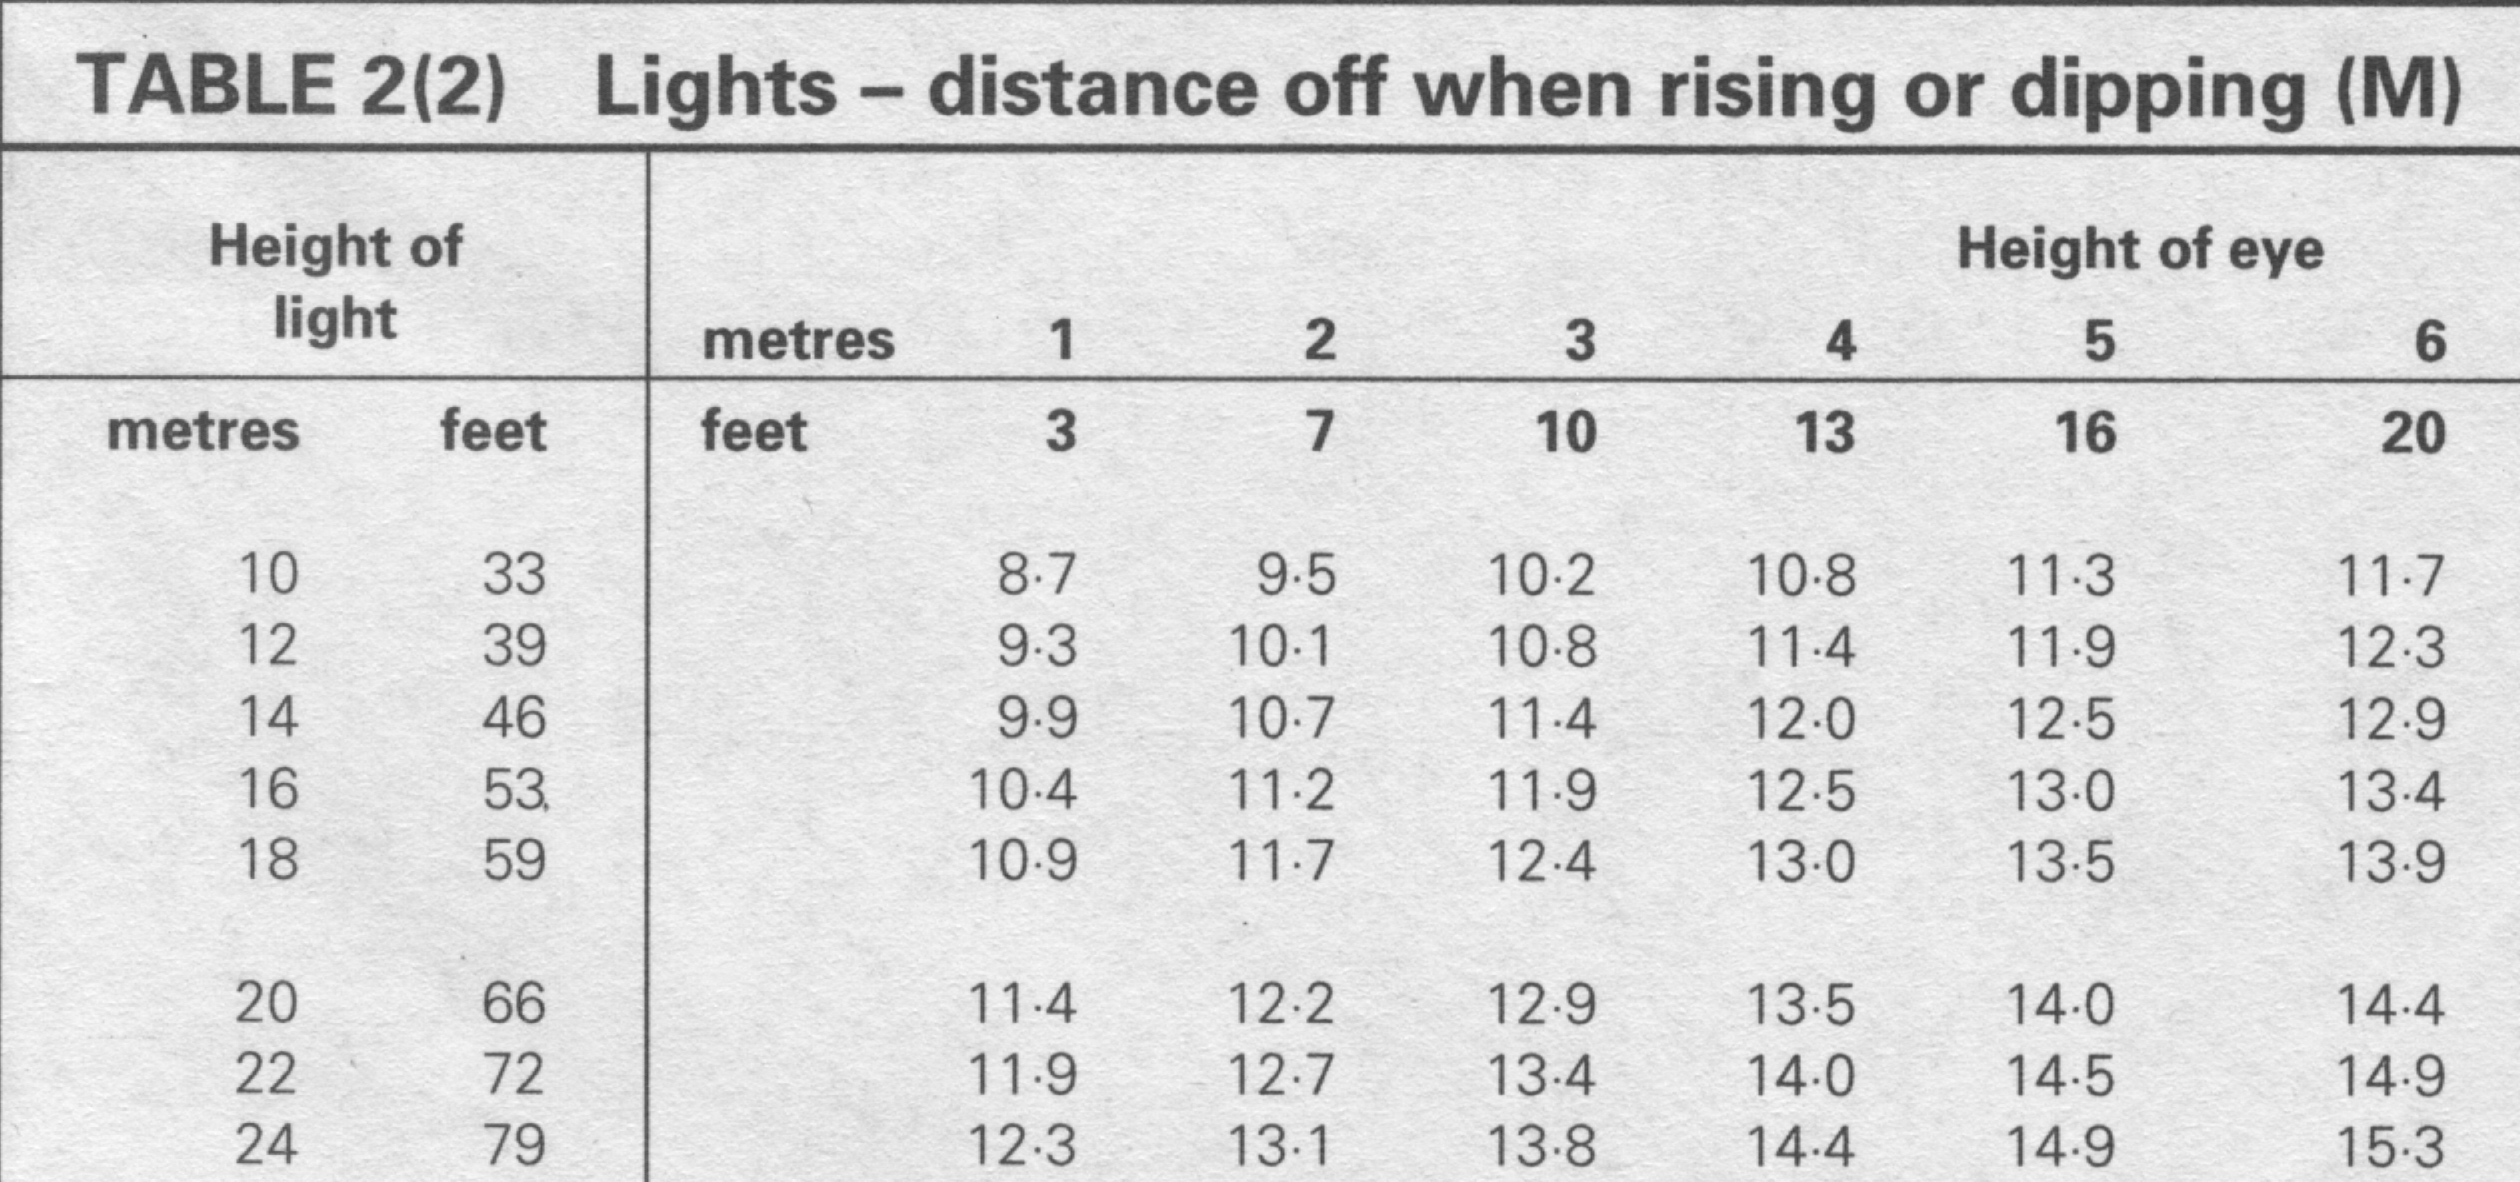
Now have a look at the table for dipping lights inside the back cover of
Practice nav table.
From the chart you can see the height above mean high water springs, of the
lighthouse. If it is Low water springs, your fix will not be so accurate, but
don't worry as your position will be further away from the light than the one
you plot. You could work out the difference between MHWS and the height of tide
at present, then add that figure to the height of the lighthouse) Either way,
just use the height of light column on the left and decide on your height of eye
along the top. (If there is a two metre sea running then add half of that to
your height of eye. You must have first seen the light at the top of a wave and
sea level is half the wave height) Come down into the table to read your
distance off. Easy!
A similar but less complicated fix is the Bearing and depth fix
Exercise 8| CRUCIAL STUFF! |
|
The Running Fix is a way of finding out your
position when you only have one point of reference.
It is a bit more complicated and worth leaving until module three.
GPS - GLOBAL POSITIONING SYSTEM
GPS is a very accurate satellite derived navigation aid. At present it is
owned and maintained by the US military. At any one time your vessel’s GPS
receiver can receive signals from a number of different satellites, depending on
the receiver’s age. These satellites are in different parts of the sky.
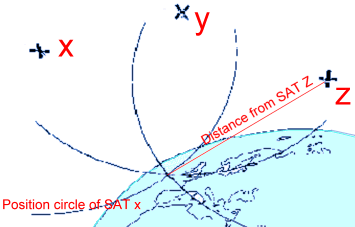
Simply, the Satellites put out coded data and an accurately timed signal and the receiver measures the time it takes the signal to arrive. Each satellite is at a different range from the receiver and the receiver uses the timed signal to find out how far away each satellite is. This distance is the radius of a very big position circle and the receiver is somewhere on that circle. With four or more satellites, and therefore four or more circles, the receiver gains a position.
GPS can give accuracy down to one meter, but at present the US military only allow a "Standard Positioning Service" (SPS). This service can be as accurate as ten to fifteen meters, but can have an error of + or - 100meters.
SPS was removed in May 2000. There is no data stating that it will not be re instated. With SPS removed there is now a likely accuracy of + or - 10 meters, but not constantly. It is only guaranteed for 90% of the time! to my knowledge, there is no data to tell us the likely accuracy of the system for the last 10% of the time! So be careful. Never rely upon one method of position finding. Always cross check with another method
So with this wonderful aid, why am I messing around with all this three point
fix rubbish? GPS and all other electronic aids are only as good as the vessels
electrical system. A dead battery means a dead GPS!. GPS’s accuracy can be
changed at will by the US. Weather conditions such as thunderstorms can affect
GPS.
Even bad mounting of an antenna can reduce GPS accuracy. eg, if the antenna is
at the mast head it is moving wildly, or if it is mounted where it cannot
"see the sky" directly and is having to search through sails or a
spray hood.
Having said that, GPS is a cheap way of almost always knowing the vessel’s position and I believe they should be carried by all boats. At time of writing, a simple hand held set costs about one hundred British pounds.
GPS can give much more than just your position. At the touch of a few buttons it can tell you how far from your destination you are and which course to steer, but remember, this bearing takes no account of tide or your compasses deviation. It calculates the course rather than takes it from measurements of the earths magnetic field.
And just like a three point fix it tells you if the satellites are two close
together, giving a bad angle of cut. An alarm will sound flashing "Hdop
high "(Horizontal dilution of precision) this is not so common on 12
channel receivers as they monitor many satellites, but on older sets is very
important.
A few jargon letters for you.
XTE =cross track error.
COG = course over the ground
TTG = time to go
SOG = speed over the ground
VMG = Velocity made good.
HDop = horizontal dilution of precision. Just like a visual fix, if the
angles between the satellites is small, the fix will be suspect. on the set you
will see that this feature has a number. The lower the number the greater
the accuracy of the fix at that time.
Cross track error
This tells you how far off the best course between two points you have
drifted.
GPS tells you your ground speed and direction. but this may not be the direction
you are steering or the speed through the water that your log is recording.
With the VMG you can see which tack (if your beating) is the most
advantageous.
Datum
Another problem which can give small but important errors when using GPS is
"Datum" Check your chart to find out which datum positions are
referred
to. Either make sure that you programme your GPS to the correct datum or move
the GPS positions as per instructions on the chart under "Satellite derived
positions". I favour the first method, but make sure you check it each
time you change charts.
There is much talk and use of "Waypoints" these days. A waypoint is
simply any position on the chart that you wish to use as a reference. You can
enter a series of waypoints into your GPS to form a "route". The GPS
will display the courses to steer and distances between these waypoints. This
can be of use, but be very careful here! Remember that the courses take no account
of tides, your compasses deviation or obstructions on the track (rocks! for
example)
To check that you have correctly inputted the lat lons of waypoints, the GPS
will give you course to steer and distance to run. Check them with a plotter on
your chart!
Mistakes made when using GPS and other electronic navigators are:
- Incorrect interpretation of information given by the set. E.g. bad plotting of Latitude and Longitude co-ordinates.
- Dangerous use of waypoints where the ground track will take the vessel over dangers.
Regarding bad plotting of latitude and longitude positions, here is a way to
cut out errors.
If you enter a convenient compass rose centre as a waypoint, when you are not
under pressure of time and check the waypoint by the method above.
You can now use this waypoint instead of plotting Lat lon's. When you need to
plot a position, bring up the course to steer and the distance to go to the
compass rose on your GPS set. (No you are not sailing to it)
Simply put a straight edge onto the rose and align it with the correct bearing
and mark off the distance from the centre. You have a position. Remember that
the bearing is towards the rose!
| CRUCIAL STUFF! |
|